

- Joined
- Apr 6, 2025
- Messages
- 57
home NAS.
Step 1: Define Your Purpose (Prioritization)
Before buying anything, decide what your server will do. This dictates where you spend your budget.
• For Basic File Backup: Prioritize high-capacity NAS hard drives and a reliable power supply. CPU and RAM power do not matter.
• For 4K Media Streaming (Plex/Jellyfin): Prioritize an Intel CPU with QuickSync for smooth video transcoding.
• For Smart Home & Docker Apps: Prioritize 16GB+ of RAM to run multiple background services smoothly.
───
Step 2: Source Your Components (Best Price Websites)
To find the best deals, use these trusted hardware and deal-tracking websites:
• PCPartPicker: Essential for checking component compatibility and tracking price drops across multiple retailers.
• ServerSupply / UnixSurplus: Excellent for finding cheap, high-quality refurbished server components.
• eBay: The best source for finding used corporate hardware, like LSI host bus adapters (HBAs) and server chassis.
• DiskPrices.com: A live-updating tracker that visualizes the cheapest price-per-terabyte hard drives on Amazon.
───
Step 3: Choose Your Budget Tier## Option A: The $`500 Budget (Entry-Level / Media Server)
• CPU / Motherboard: Intel N100 Integrated Mini-ITX Board (~`$130)
• RAM: 8GB or 16GB DDR4 SODIMM (~$`35)
• Case & Power Supply: JONSBO N2 Mini-ITX NAS Case + 450W SFX PSU (~`$150)
• Boot Drive: 256GB NVMe SSD (~$`25)
• Storage Drives: Two 4TB NAS Hard Drives in RAID 1 (~`$160 total)
Option B: The $`1,000 Budget (High-Capacity / Power User)
• CPU: Intel Core i3-12100 (~`$110)
• Motherboard: B760 Mini-ITX or Micro-ATX with 4–6 SATA ports (~$`130)
• RAM: 32GB DDR4 or DDR5 RAM (~`$70)
• Case & Power Supply: JONSBO N3 (8 drive bays) + 500W SFX PSU (~$`210)
• Boot Drive: 500GB NVMe SSD (~`$40)
• Storage Drives: Three 8TB NAS Hard Drives in RAID 5/Z1 (~$440 total)
───
Step 4: Assemble the Hardware
1. Install Core Components: Mount the CPU, RAM, and your NVMe boot SSD onto the motherboard before putting it in the case.
2. Mount the Board and PSU: Secure the motherboard and power supply into your NAS chassis.
3. Insert the Storage Drives: Slide your large mechanical hard drives into the drive bays. Connect them using SATA data cables to the motherboard, and SATA power cables to the power supply.
4. Plug in Core Cables: Connect the case power button, the 24-pin motherboard power, and the 8-pin CPU power cables.
───
Step 5: Install the Operating System
1. Download the OS: On your daily computer, download the ISO file for TrueNAS Scale (free/robust) or Unraid (paid/easiest to expand).
2. Flash a USB Drive: Use a free tool like Rufus or balenaEtcher to burn the operating system ISO onto a blank USB flash drive.
3. Boot the NAS: Plug the flashed USB, a temporary monitor, a keyboard, and an Ethernet cable into the NAS. Turn it on and select the USB drive as the boot device in the BIOS.
4. Run the Installer: Install the OS onto your small NVMe boot SSD. When complete, remove the USB drive and reboot the server.
───
Step 6: Configure Storage and Network
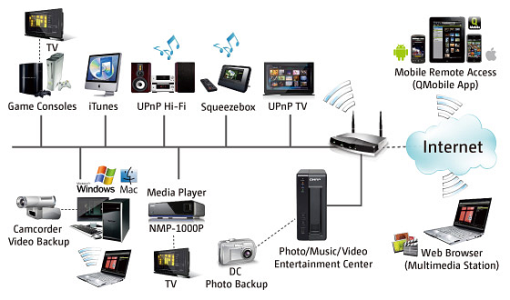
1. Log in via Web Browser: Look at the NAS monitor to find its IP address (e.g., 192.168.1.150). Type this IP into a web browser on your daily computer.
2. Create Your Storage Pool:
• If using 2 drives: Choose RAID 1 (Mirroring).
◦ If using 3+ drives: Choose RAID 5 / RaidZ1 (Parity) so one drive can fail without data loss.
1. Enable Network Sharing: Turn on the SMB (Server Message Block) sharing service in your NAS settings and create a user account with a password.
2. Connect Your Devices: On Windows File Explorer or Mac Finder, select "Map Network Drive," type in your server's network path, and log in to start dragging and dropping files.
Step 1: Define Your Purpose (Prioritization)
Before buying anything, decide what your server will do. This dictates where you spend your budget.
• For Basic File Backup: Prioritize high-capacity NAS hard drives and a reliable power supply. CPU and RAM power do not matter.
• For 4K Media Streaming (Plex/Jellyfin): Prioritize an Intel CPU with QuickSync for smooth video transcoding.
• For Smart Home & Docker Apps: Prioritize 16GB+ of RAM to run multiple background services smoothly.
───
Step 2: Source Your Components (Best Price Websites)
To find the best deals, use these trusted hardware and deal-tracking websites:
• PCPartPicker: Essential for checking component compatibility and tracking price drops across multiple retailers.
• ServerSupply / UnixSurplus: Excellent for finding cheap, high-quality refurbished server components.
• eBay: The best source for finding used corporate hardware, like LSI host bus adapters (HBAs) and server chassis.
• DiskPrices.com: A live-updating tracker that visualizes the cheapest price-per-terabyte hard drives on Amazon.
───
Step 3: Choose Your Budget Tier## Option A: The $`500 Budget (Entry-Level / Media Server)
• CPU / Motherboard: Intel N100 Integrated Mini-ITX Board (~`$130)
• RAM: 8GB or 16GB DDR4 SODIMM (~$`35)
• Case & Power Supply: JONSBO N2 Mini-ITX NAS Case + 450W SFX PSU (~`$150)
• Boot Drive: 256GB NVMe SSD (~$`25)
• Storage Drives: Two 4TB NAS Hard Drives in RAID 1 (~`$160 total)
Option B: The $`1,000 Budget (High-Capacity / Power User)
• CPU: Intel Core i3-12100 (~`$110)
• Motherboard: B760 Mini-ITX or Micro-ATX with 4–6 SATA ports (~$`130)
• RAM: 32GB DDR4 or DDR5 RAM (~`$70)
• Case & Power Supply: JONSBO N3 (8 drive bays) + 500W SFX PSU (~$`210)
• Boot Drive: 500GB NVMe SSD (~`$40)
• Storage Drives: Three 8TB NAS Hard Drives in RAID 5/Z1 (~$440 total)
───
Step 4: Assemble the Hardware
1. Install Core Components: Mount the CPU, RAM, and your NVMe boot SSD onto the motherboard before putting it in the case.
2. Mount the Board and PSU: Secure the motherboard and power supply into your NAS chassis.
3. Insert the Storage Drives: Slide your large mechanical hard drives into the drive bays. Connect them using SATA data cables to the motherboard, and SATA power cables to the power supply.
4. Plug in Core Cables: Connect the case power button, the 24-pin motherboard power, and the 8-pin CPU power cables.
───
Step 5: Install the Operating System
1. Download the OS: On your daily computer, download the ISO file for TrueNAS Scale (free/robust) or Unraid (paid/easiest to expand).
2. Flash a USB Drive: Use a free tool like Rufus or balenaEtcher to burn the operating system ISO onto a blank USB flash drive.
3. Boot the NAS: Plug the flashed USB, a temporary monitor, a keyboard, and an Ethernet cable into the NAS. Turn it on and select the USB drive as the boot device in the BIOS.
4. Run the Installer: Install the OS onto your small NVMe boot SSD. When complete, remove the USB drive and reboot the server.
───
Step 6: Configure Storage and Network
1. Log in via Web Browser: Look at the NAS monitor to find its IP address (e.g., 192.168.1.150). Type this IP into a web browser on your daily computer.
2. Create Your Storage Pool:
• If using 2 drives: Choose RAID 1 (Mirroring).
◦ If using 3+ drives: Choose RAID 5 / RaidZ1 (Parity) so one drive can fail without data loss.
1. Enable Network Sharing: Turn on the SMB (Server Message Block) sharing service in your NAS settings and create a user account with a password.
2. Connect Your Devices: On Windows File Explorer or Mac Finder, select "Map Network Drive," type in your server's network path, and log in to start dragging and dropping files.


